The epic conclusion of Patrick's and my Sealion '44 story was played out a few nights ago in perhaps one of the most dramatic games of
Flames Of War I have ever played!
To catch up on the fluff behind this raid, or to read the dramatic tale of the events below, check out
this thread on the WWPD forum.
 |
| The Wattisham Airfield |
We fought the battle as a hybrid between a more traditional Flames Of War game and a raid. The table was a standard 6x4 with an airstrip running down the middle. On one side were three fighter-sized aircraft, on the other were two medium bombers and the airbase headquarters. The objective of the raid was two fold:
- Cause as much chaos and destruction (using the Demolition special rules for raids found in Burning Empires) as possible.
- Capture both twin-engined planes as well as the Lysander utility aircraft (the black one)
 |
| The WAAF and the Wing Commander |
Some story-driven secondary objectives were added:
- Capture the WAAF and Wing Commander figures.
- Capture any RAF crew with a camera.
Special Rules
We also engineered a few rules for the mission:
Capturing Aircraft
- A Pilot Team may board the aircraft in the same way you would mount a transport.
- In the Assault Step, the Pilot Team can attempt to fire up the engines with a successful Skill Check.
- Once the engines were going, the plane could move up to 6"/15cm per turn. It cannot Storm Trooper.
- Once the plane leaves the table via the airstrip, it escapes to safety.
- All teams may shoot at the plane using the Gunfire special rules found in Burning Empires.
 |
| The Lysander aircraft objective |
 |
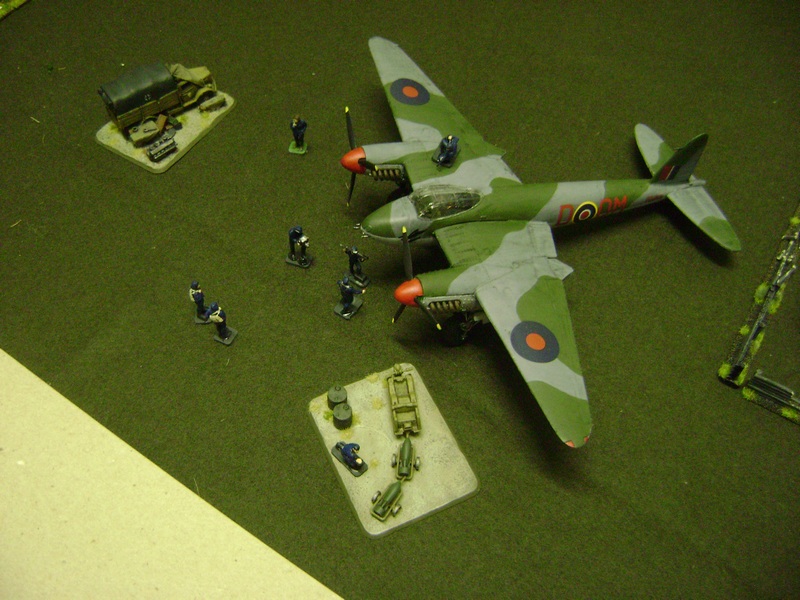
| The Mosquito aircraft objective |
 |
| The Beaufighter aircraft objective
|
The C-47 Arrival
We stagered the arrival of the three C-47s, one each turn. I split my force into three loads, with one load exiting the door of the one C-47 model each turn. This cuts down on unnecessary models and helped concentrate the mission.
Pilot Teams are independent infantry teams armed with a pistol. They cannot Storm troop. One Pilot Team arrives with each plane (three in total).
PaK Packs
After my experience at Great Bromley, I decided to take along three air transportable Pak36s. I assumed that these guns were broken down into components, similar to the M1A1 75mm Pack Howitzer (which, incidentally, I used as a proxy in this game). These were slung under the C-47 for transportation. In the game, I thought it would be fun to have to have the platoon try and actually assemble their guns before they could get them into action. For that we simply said once a gun arrived (one per C-47, so one arrived per turn), at the beginning of the turn I needed to roll a 5+ to assemble and get the gun ready for action. It was considered to have moved in the turn it was assembled, but otherwise good-to-go!
Sniper Deployment
My sniper is a character in the story and since I don't really have a deployment area in the game we developed an expanding deployment area concept to reflect his cunning and concealed movement. The sniper arrived with the first load. In turn one it could deploy any where within 12"/30cm of the C-47 door. Each following turn expanded the deployment area by an additional 12"/30cm and so on.
No Company Morale
The British are safe in the rear areas while the FJ have no where to run. Platoon morale still in effect, however.
Scattered Reserves
We used the Scattered Reserves rule, with all of Patrick's force in reserve. We also dictated that platoons containing vehicles had to arrive last before platoons on foot.
Disguises?
The story refers to my FJ/Brandenburgers using disguises. Since the FJ hit the ground running in this game, we did not to include Enemy Disguises in the game, rather used it to explain why the FJ were able to exit the plane and get close to the headquarters buildings without being detected. We assumed that the alarm went up the second I opened fire on turn one.
The Forces
HQ (Panzerknacker SMG upgrades, 1x Sniper, 2x GW42 Stummelwerfers)
FJ Platoon (2/3 Strength, Panzerknacker SMG)
FJ Platoon (2/3 Strength, Panzerknacker SMG)
FJ Pioneer Platoon (2/3 Strength, Panzerknacker SMG, 2x Flamethrowers)
FJ Mortar Platoon (4x GW42 Stummelwerfer)
FJ Anti-tank Platoon (3x PaK36)
Patrick's Wattisham RAF Garrison
HQ (with Carrier transport, bagpiper)
Rifle Platoon (full strength)
Rifle Platoon (full strength)
Rifle Platoon (full strength)
Heavy Machine-gun Platoon (full strength)
Recce Platoon (3x Humber III 2x LRC)
Anti-aircraft Platoon (2x Bofors)
The Game
Report by Patrick Gribble
RAF Wattisham is an RAF base in Essex, capable of taking
light bombers such as the Beaufighter or Mosquito. In Sealion 44 it is become a
key forward base for striking at Axis supply convoys in the Channel and has
also become home to a number of fighter squadrons from overrun bases in
southern England. It is the target of a raid by KG200 and Brandenburgers
disguised as US paratroopers.
Three C-47s in US markings land at Wattisham and troops in
US uniforms disembark, watched by interested RAF personnel. Suddenly, troops
open fire on the airfield defences.
Turn 1
Turn 1, German: The 1st Fallschirmjager platoon deploys from the C-47s, along with the mortars, the CO and the sniper. The mortar platoon fires at the far Bofors emplacement but miss, however the company mortar doesn’t and the Bofors is destroyed by a direct hit. The FJ platoon destroys the near Bofors with shooting, then uses the ‘Shooting Too Successful’ rule to move 4 inches. The first pilot heads towards the nearby Beaufighter.
Turn 1, British: No reserves for the British. RAF personnel duck for cover or run for their lives, fleeing the ‘US’ paratroopers.
 |
| The Brandenburgers deploy |
 |
| First Platoon knocks out the Bofors emplacement. |
Turn 2
Turn 2, German: The 2nd Fallschirmjager platoon deploys along with the 2ic and 2 PAK 36s (unassembled). The sniper stays hidden. 1FJ doubles towards the Mosquito. The mortars remain still. 1 of the PAKs passes its skill check and is assembled as 2FJ moves towards the Tempest. The first pilot runs towards the Beaufighter as the second pilot doubles after 1FJ. In the firing, the Tempest is destroyed by mortar fire but the Spitfire remains intact.
Turn 2, British: The first reserves begin to arrive as one reserve is successfully rolled for. Using the ‘Scattered Reserves’ rule, the 1st Infantry platoon arrives near where the Tempest just exploded accompanied by the CO and 2ic. They immediately take cover behind some supplies and commence firing, scoring 1 hit from 7 shots but causing no kills. RAF personnel, especially the Wing Commander and WAAF, who have important information, continue to flee.
 |
| First Platoon moves out, while the 2iC handles the defense of the C-47s |
 |
| The first of the British arrive! |
Turn 3
Turn 3, German: The Pioneers, 3rd pilot and the 3rd PAK arrive. The 2ic readies charges on the control tower, 1FJ moves towards the Mosquito and the 2nd pilot moves with them. The first pilot reaches the Beaufighter. The Pioneers head towards the HQ building, the 2 unassembled PAKs don’t pass their skill check and remained unpacked. 2FJ, the mortars and the one available PAK fire at 1st Platoon, killing four stands and pinning the platoon. The Pioneers stormtroop towards the HQ as the first pilot starts the Beaufighter. 1FJ stormtroop towards the Mosquito, 2FJ stormtroop out of range and the 2ic fails to destroy the control tower.
Turn 3, British: Having taken heavy losses and at half strength, 1st Platoon digs in to cover the runway. Reserves, in the shape of the 2nd infantry platoon, arrive behind the HQ buildings. They open fire on 1FJ, scoring 5 hits and no kills, although 1FJ is now pinned down.
 |
| The Pioneers rush to the HQ buildings. |
 |
| The CiC begins the first of several attempts to demolish the control tower. |
 |
| First Platoon reaches the Mosquito. |
 |
| A pilot gets the Beaufighter in motion. |
 |
| More British troops arrive |
Turn 4
Turn 4, German: 1FJ fail to unpin, but the CO manages uses his presence to pass a reroll. The Pioneers charge towards the HQ building. 1 & 2 FJ both keep still. Both the PAKs pass their skill checks and are now assembled. The Beaufighter starts taxiing as the remaining pilots run towards the Mosquito and the Lysander at the end of the runway. In the firing, 1FJ fires at 2nd Platoon, scoring 8 hits and 3 kills, the Pioneers score 1 hit with no kills and the mortars range in and kill the PIAT crew. The PAKs fire at the 1st Platoon, no hits. 2FJ Go To Ground. During Stormtroop, 1FJ towards the Mosquito, the Pioneers destroy the ammunition bunker for a Bofors and the 2ic fails to blow up the control tower again.
Turn 4, British: The 3rd Infantry platoon arrives as reserves, again behind the HQ buildings and rush forward to occupy the slit trenches around the building. The 2nd Platoon unpins and stays still. In the firing, 2nd Platoon kills 1 stand from 1FJ and the platoon mortar kills the pilot heading for the Mosquito. 3rd Platoon kills 1 stand from the Pioneers.
 |
| The Pioneers destroy the Bofor's ammo bunker |
 |
| Still trying... |
 |
| First platoon defends the Mosquito as the pilot (small stand) runs to commandeer the objective. |
 |
| The Pioneers clash with a British rifle platoon |
 |
| The perimeter holds, for now! |
 |
| Second Platoon moves for cover behind the Tempest wreck. |
Turn 5
Turn 5, German: 1FJ remains still, 2FJ move towards the 1st Platoon and the Pioneers move towards the 3rd Platoon. The Beaufighter keeps taxiing towards the runway. 1FJ kills 3 stands in 2nd Platoon. The company mortar fires at the control tower and causes no damage. 2 mortars fire at the objectives by 1st platoon and destroy 1, the other 2 mortars destroy the Spitfire. PAKs destroy the other 2 objectives by 1st Platoon. The Pioneers flame 3rd Platoon, killing 4 stands but scoring no kills with rifle fire. The Pioneers then go in with an assault, killing two more stands. 3rd Platoon comes back swinging and destroy the Pioneers. The 2ic again fails to blow up the control tower, but 1FJ destroy 2 objectives by the Mosquito.
Turn 5, British: 2nd platoon fail their morale check but 3rd Platoon pass theirs. The final reserves arrive, HMGs behind where the Beaufighter used to be and Armoured Cars behind the destroyed Spitfire. The cars charge across the airfield while the HMGs stay still. 3rd Platoon fire on the PAKs and score 2 hits but no kills. 2 of the HMGs score another 3 hits on the PAKs, pinning them. The other HMGs fire on the Beaufighter, but fail to destroy it. 1st Platoon score 2 hits on 2FJ but no kills and the Cars score 4 hits with 1 kill, pinning 2FJ.
 |
| British rifles brace for the Pioneer charge. |
 |
| Secondary objectives are demolished to provide some extra cover for First Platoon. |
 |
| Second Platoon and the Anti-tank guns open fire on a few secondary objectives. |
 |
| The Beaufighter escapes! |
 |
| Armored cars! |
 |
| Armored cars rush the perimeter and put pressure on First Platoon |
 |
| A Humber moves into assault range of the perimeter. |
 |
| British heavy machine-guns arrive and open fire on the Germans. |
Turn 6
Turn 6, German: The PAKs unpin but 2FJ don’t. The sniper moves into position near the HMGs. The Beaufighter continues taxiing away as the PAKs move to engage the Armoured Cars and 1FJ hold position near the Mosquito as the third pilot arrives. The PAKs destroy 1 Armoured Car and bail a second. The HMGs lose 1 stand to the sniper. The control tower is finally destroyed by the 2ic.
Turn 6, British: The HMGs fail to unpin but the Armoured Car remounts. Then the Cars charge the German units by the C-47! 3rd Platoon fires at the sniper but he survives. The HMGs kill the PAKs with a hail of bullets, the Armoured Cars fire at the mortars, not killing anything but successfully pinning them. Then the Armoured Cars assault the mortars. Defensive fire does no damage and the Cars kill 2 stands. The mortars, backed by the 2ic and some stands from 2FJ, choose to continue but fail to score any hits. The Cars kill another stand and the mortars fail motivation then their morale breaks. The 2ic and the stands from 2FJ fall back as the Cars consolidate.
 |
| Finally! |
 |
| The perimeter starts to fold. |
 |
| The sniper is revealed to hold off the HMGs |
Turn 7
Turn 7, German: The last pilot has finally reached the Mosquito, which he successfully starts. 2 FJ hastily board the C-47 which has started to move down the runway as 1FJ move to engage the Cars. The 2ic, realising no-one’s leaving while the Cars control the runway, grabs a Panzerknacker and charges the two on the runway by himself! The sniper fires again at the HMGs but doesn’t score a kill. 1FJ fires desperately at the Cars on the runway and manages to bail one of them. The 2ic closes through the defensive fire from the other car and assaults it with the Panzerknacker, blowing it up. Being under half strength, the Cars take a morale check, which they fail. The Armoured Car threat is gone!
Turn 7, British: The HMGs unpin and lay down heavy fire on the C-47, scoring 13 hits which sees the Germans fail 4 saves. Any firepowers on ‘6’? No! The C47 survives to taxi out of range, taking with it the survivors from 1 & 2FJ.
 |
| The 2iC does the impossible! |
 |
| The pilots mount up the Mosquito and escape |
 |
| First platoon rushes to meet the incoming C-47 and makes a narrow escape! |
Conclusion
At this point, the game was called, with the British unable
to prevent the escape of the surviving raiders. The raiders had stolen two aircraft, blown up another two, the control tower, 6 objectives and an
ammunition bunker. They’d also captured a camera freshly returned from a recon
run, but failed to capture the wing commander and the WAAF before they managed to escape.
We decided that the raid was a success, despite the loss of the support weapons. Since the raiders themselves got away with a Beaufighter and a Mosquito, KG200 will be well stocked to run some covert recon missions over Britain. It was a truly nail-biting, heart-stopping game. Even Theodore couldn't contain his excitement!
Thanks for reading!
 Pilot Teams


 No Company Morale


Awesome! A great game and a very cool homebrew mission.
ReplyDeleteGreat report with lots of pics. Thanks.
sweet action
ReplyDeleteThis is one of the best battle reports I've ever read. Good lord. So awesome! You guys need to post this on the FOW site.
ReplyDelete