Battlereport: The Battle for Cabourg

We chose to fight at Cabourg, owing to the lumpy terrain on our table. We cited the dips and gullies as Difficult Going, reflecting the flooded areas.


Now with all British forces bailed out or destroyed, the Germans must pass a company morale check before ending the game...

 |
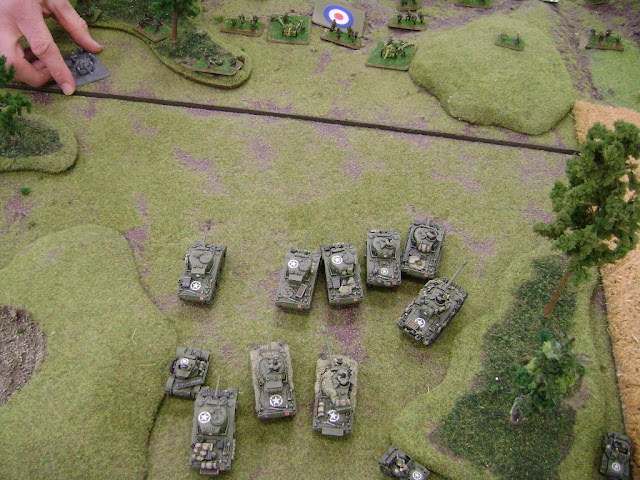
| Aerial reconnaissance photo of the battlefield, taken from behind German lines. |

Our armies:
Pat's SS-Panzergrenadiers
(Fearless Veteran)
CO with Panzerfaust
3-squad Panzergrenadier platoon with command panzerfaust
and attached panzerschreck
3-squad Panzergrenadier platoon with command panzerfaust
and attached panzerschreck
3-squad Panzergrenadier platoon with command panzerfaust
2-section mortar platoon
1-section "Kampfgrupped" mortar platoon
3-gun PaK 40 platoon (in ambush)
3-gun FlaK38 2cm platoon
2-gun FlaK36 8.8cm platoon with extra crew

Mike's Grenadier Guards Armoured Squadron
(Confident Trained)
(Confident Trained)
HQ with 2 Sherman V
Armoured platoon, 3 Sherman V and 1 Firefly VC
Armoured platoon, 3 Sherman V and 1 Firefly VC
Armoured platoon, 3 Sherman V and 1 Firefly VC
Armoured Anti-aircraft platoon, 2 Crusader AA
Motor platoon with 3 squads
Armoured Car Platoon, 2 Daimler armoured cars and 2
Daimler Dingo scout cars
Field Battery with 4 Sextons
We rolled up Fighting Withdrawal and with Pat's SS rated as an Infantry company, it fell to Mike's tanks to attack! The SS are dug in and wait grimly for the approaching British tanks, determined to hold long enough to withdraw successfully. The British tankers prepare to assault, ready to smash through the rear-guard opposing them.
 |
| Pat deploys a SS-Panzergrenadier platoon and a Mortar Platoon on his left objective. An 88 (on the right) covers the direct approach. |
 |
| Mike deploys the bulk of his force in the center, avoiding the 88s' fields of fire. His battleplan involves holding the SS- Panzergrenadiers on the right, splitting Pat's trackless force in two and then going for the center objective. |
 |
| Mike's attack on his right is largely diversionary, hoping to tie down the SS-Panzergrenadiers in the village so that they cannot move to reinforce the center. He's put his lowest-points value troops on the job to ensure efficient use of the Sherman Vs. This task force includes: Crusader AA, a motor platoon, a Sherman OP, and the 2iC Sherman V. |

Pat's deployment means that Mike's recce moves sees moves of on average 1 inch, one Dingo gets to move all of 1/8".
Game on!
Allied Turn 1
All units, except for one armoured platoon and
the Sextons, move up. Shooting kills one of the FlaK 38s. The Sextons fail to
range in.


Axis Turn 1
Somehow, Mike forgets that Patrick has Pak40s in Amabush and fails to send forth his Recce screen, opting instead to get them into position to use Eyes and Ears next turn.
The PaK40s ambush from the trees bordering the right-hand objective and kill one Sherman and one Firefly. Two hits from six needing 3s, not a good start!
The FlaK38s fire at the recce platoon but fail to cause any damage. A mortar bombardment bails a Crusader AA.
 |
| Lucky for the Guardsmen, the ambush is not fatal. They will have their revenge! |


Allied Turn 2
One armoured platoon and the recce move
towards the right-hand objective, the damaged platoon stays put to deliver a full semi-indirect barrage of 75mm shells at the PaKs.
The motor platoon and 2iC Sherman V move up behind the houses towards the
left-hand objective.

Firing kills two of the PaK40s and both of the remaining FlaK38s in the center. Again the Sextons fail to range in!

Axis Turn 2
The flak platoon routs, first blood to
the Tommies! The one remaining PaK40 only succeeds in bailing a single Sherman.
One of the 88s fires at the Armoured platoon in the wheat field in the centre
of the table, completing missing!
The mortars range on the Crusaders again but
fail to do any damage. Everyone else keeps their heads down, staying Gone to
Ground to weather the incoming storm of lead!
Allied Turn 3
Both the bailed Sherman and AA Crusader
remount. The motor platoon moves forward
as well as the Crusaders. The Sherman platoon in the wheat field begins to move
forward and kills the 88 that fired at it. Also, the last PaK40 is destroyed.
However, it soaks up a lot of shots. The Sextons fail to range again.

Axis Turn 3
The small Kampfgruppe platoon of mortars
is withdrawn. The large mortar platoon ranges on the motor platoon in its
half-tracks, but causes no damage. The rest of the company keeps their heads
down.

Allied Turn 4
The Armoured platoons continue to move
forward. Furious firing on the Panzergrenadiers pin all three infantry platoons.
Then the Shermans surge into the assault on the platoon holding the right-hand
objective. CARNAGE! The battle rages.
On round 2 (or 3) the SS fail their
morale check. Even the CO quails at the sight of the tanks in front of him. At
that moment the company dog sprints forward and savages a crewman of a bailed
tank. One way trip to Heaven! With shouts of “For the 12th! For the
Fuhrer!” the young Panzergrenadiers rally and charge. The Shermans stay in it
for another round and the SS are forced to check their motivation for another
turn. Knowing that a fail destroys the platoon, it's tense - ‘4’! The counterattack
goes in and the Sherman platoon is destroyed. The SS consolidate to their holes
or back into the woods.

Axis Turn 4
The German mortar platoon is removed as
the withdrawal continues. Everyone else unpins, keeps still and holds fire.

Turn 5
From now on we kind of lost track, it got that intense! The turns blended together as we forget to take notes. So, some events might not be written in the correct turn.
Having not ranged at all, the Sextons move
forward to provide direct fire. The Shermans in the wheat field grind forward
and assault the centre panzergrenadier platoon. They are pushed back and all
three Panzergrenadier platoons are pinned due to concentrated fire. In their
turn, the Germans take a delay counter and unpin all their platoons.

Turn 6
The Sherman platoon from the wheat field
destroys the centre platoon through a combination of gunfire and assault. The
German CO is now the only one contesting the centre objective. Another assault
is sent against the platoon near the holding the right-hand objective, but
fails. Part of the motor platoon attempt to assault the left-hand platoon but
are destroyed.
In their turn the Germans take a delay counter, remove the
right-hand objective and unpin their platoons. The left-hand platoon destroys
the rest of the motor platoon with massed MG fire and the only other remaining
Panzergren platoon stays gone to ground.

Turn 7
The Shermans assault, the Sextons assault,
everyone’s assaulting the platoon near the centre objective. Panzerfausts beat
back attack after attack. Oh the Humanity! Burning and bailed tanks and
self-propelled artillery litter the perimeter of the German position. The
defenders must test as they’re under half, but with the CO shouting “Hold your
positions!” they stay.
The remaining British objective is removed. The
defenders unpin their platoons and remove the sole remaining 88. It hasn’t
fired a shot but has been treated with healthy respect by all Allied forces.
The forces are so close panzerfausts are firing at tanks without assaulting.
The remaining recce is pushed to under half due to panzerschreck fire and fails
a morale check.
 |
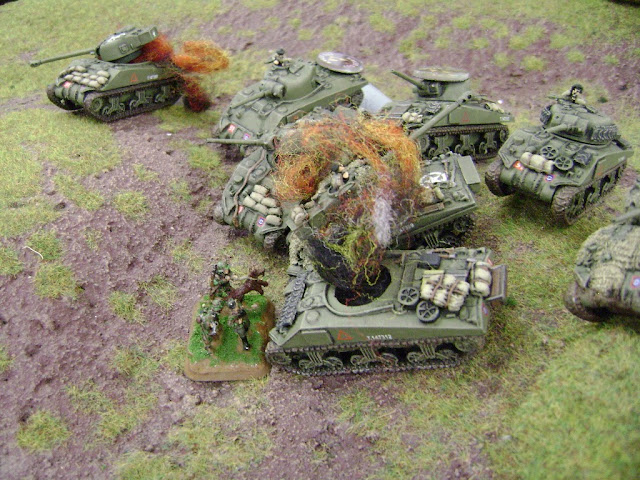
| On the German left flank, Mike's diversionary attack disintergrates. The 2iC bails out of his tank, knocked out by a Panzerschreck. The Crusader AA tanks cover his hasty retreat! |

Turn 8
With nothing left to lose and the Germans about to successfully retreat, there is only one option for the British CiC, the only operating Sherman V on the battlefield: Assault the SS CiC! With a little luck with him dead, the SS-Grenadiers would automatically fail their compulsory Company Morale check next turn and rout.
So with a volley of HE and MG shots, the CiC misses, but closes for the kill. The German commander is waiting for him and fires his Panzerfaust, glancing off the British tank and causing it to break off!

Now with all British forces bailed out or destroyed, the Germans must pass a company morale check before ending the game...
Result of 4: A close German victory!

(Mike reckons the dog must have been pretty damn scary!)
Thanks to Pat for the write up!
Fantastic AAR!
ReplyDeleteGreat commentary. I need to contact HQ about getting aerial reconnaissance photos of the battlefield for the forces under my command.
ReplyDeleteVery cool AAR. It looked like a nice close game which is what I always prefer playing in and watching.
ReplyDeleteBen
This looked like alot of fun guys. THanks for sharing!
ReplyDeleteI always find Fighting Withdrawal is a frantic game for both players. Great AAR!
ReplyDelete