It’s the 70th anniversary for Market Garden this year and the gents at TCOW (that club out west) have been celebrating it with a Firestorm: Market Garden Campaign over the past few months. They have been building up for the final battle, carefully planning and waging a merciless war. The stage is now set and the guys extended an open invitation to all FlamesCon goers to stop in and lend a hand toward final victory!
On Saturday night we ran a Market Garden huge multi-player battle to mark the dramatic conclusion of the TCOW Firestorm: Market Garden Campaign. The game was a mega-battle format with several tables lined up to make one large table. Players took charge of an army and played for the cause they joined.
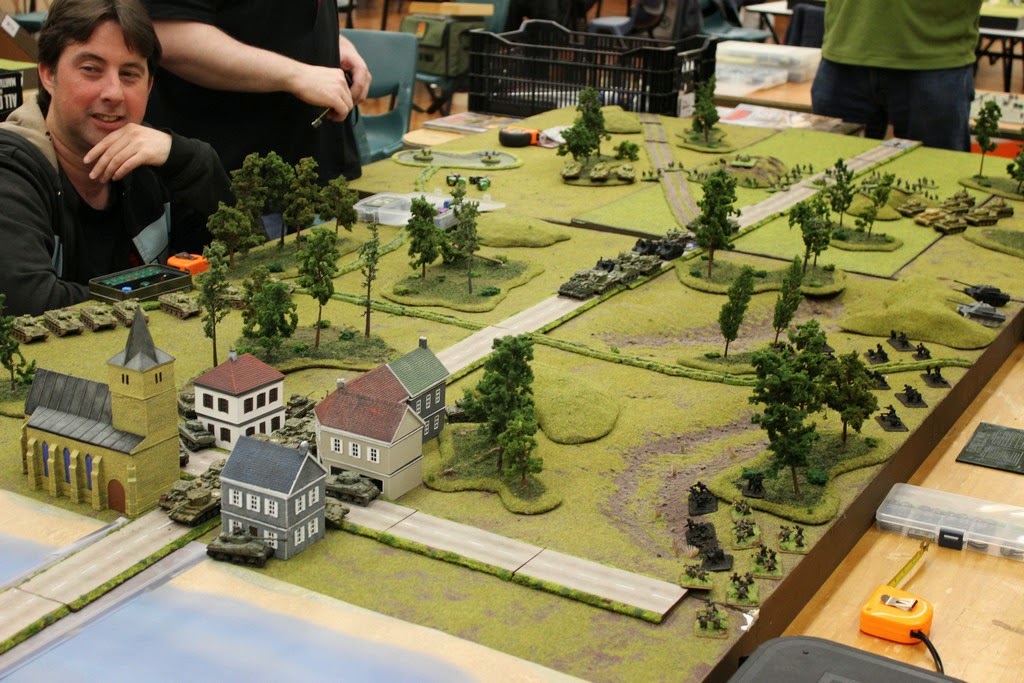
The battlefield was simple, a 24' stretch of road from one table to the last, spanning six total boards. Arnhem was placed at one end, a small collection of buildings in the middle represented Nijmegen, and two river mats were placed to play the part of the Waal and Rhine rivers. The deployment zones were not set and only determined once we knew the final strategic movements on the Firestorm board.
At the last TCOW meeting, we ran some FlamesCon test games and we decided to allow them to count as FS: Market Garden games, despite being played in EW, on the eastern front, etc. All players had to do was declare which side they were fighting for and we were off. The results of the games were meant to be played out on the campaign board (and they were), however I messed up and forgot to have the generals execute strategic and exploit moves. Ooops!
So instead, I reset the board and for each 'win' scored at the last meeting, the Axis and Allied generals got an 'auto-win' token to be played during a series of automated games or to cancel an opposing tken. This simulated the campaign's turn 4 (the final turn 5 being the mega-battle itself). As it happened, both sides won two games and so the tokens were used to cancel auto-wins, so that little mechanic was not really a good one! Oh well.
Anyway, seven games were generated for Turn 4, and they were placed at very high-profile locations, including Arnhem Bridge, Eindhoven, Nijmegen Bridge, and s'Hertogenbosch. The Allied held Arnhem tight and took Nijmegen, completing a nearly contiguous supply line to Arnhem. However, the Germans cut the highway at Eindhoven with a powerful attack and suddenly the entirety of the Allied advance was cut off!
| Allied Players | Army | | Axis Players | Army |
| Andrew H. (CiC) | Welsh Guards Armoured Recce | | Greg L.(CiC) | 6. Fallschirmjager |
| Damian C. (2iC) | British Parachute | | Damian R. (2iC) | KG Hummel |
| Dan L. | British Airlanding | | Jonathan C. | 85. Grenadier |
| Paul M. | US Parachute (82nd Airborne) | | Ryan J. | KG Knaust |
| Mike H. | US Parachute (82nd Airborne) | | Gavin v.R. | KG Knaust |
| Blair R. | Irish Guards Armoured | | Kit G. | 85. Grenadier |
| David G. | 11th Armoured | | Andrew A. | StuG Batterie |
| Bob P. | Welsh Guards Armoured Recce | | Pat G. | KG Swoboda |
| | | Steve E. | Panzer Brigade 107 |
With these results, the Allies were positioned in the Nijmegen and Arnhem, but as they failed to take the gap in between, the Axis were allowed to set up in between. I divided out the 17 players based on what they were taking and assigned them a deployment zone along the map that roughly corresponded to the location of a related Firestorm troop on the campaign map.
 |
| Arnhem held by the British paras and besieged by three German players. |
 |
| My 82nd lines up to press north to Nijmegen. |
Damian C. and Daniel played off British Para firestorm troops and set up in Arnhem. Paul and I played off US Paratroopers and set up a defense in Nijmegen. Dave, Blair, Andrew H., and Bob committed their tanks to where 30 Corps' tanks were located in and south of Nijmegen.
Gavin and Ryan's joint KG Knaust and Pat's KG Swoboda played off a half-track and an Flak 8.8cm token set up east and north of Arnhem. Kit's Grenadiers anchored themselves on a Security troop token and blocked the way between Arnhem and Nijmegen. Andrew A.'s Stug Batterie played off a Panzer IV token and attacked Hell's Highway to the north and east of Nijmegen. Coming from the southeast Steve's Panzerbrigade 107 attacked from the location of a Panther token. Greg's FJ attacked from the southwest, based on the location of an FJ token and Jonathan's Grenadiers and Damian R's KG Hummel attacked from the south, up from Eindhoven.
The result was that the Allies were trapped in a German vice with enemies attacking the prize bridge at Arnhem and a massive armored and infantry assault coming up from the north.
Three Allied and three Axis objectives were placed at the critical points. The Allies had one along Hell's Highway in the south, one in Nijmegen, and the third in Arnhem. The Axis had one at the extreme southern end of the battlefield, one coming in from the northeast of Nijmegen, and one to the east of Arnhem. These objectives counted as a VP at the end of the battle. Sides also gained a VP for knocking out an enemy company (which could then respawn at a friendly active objective, i.e. one not held by the enemy).
With that it was game on!
 |
| Kit's Grenadiers and Jagdpanthers prepare to cut Hell's Highway between Arnhem and Nijmegen. |
 |
| British parachute and airlanding troops establish a perimeter in Arnhem. Patrick encircles 2/3 of the perimeter with 88s while Gavin and Ryan lead KG Knaust in a direct assault. |
 |
| Damian's Tigers and Jonathan's grenadiers charge north to hit Nijmegen from the south. |
 |
| Bob's Cromwells and Challengers are caught in an ambush from Steve's Panthers. David heroically provides a screen to allow Bob's remaining tanks to make a dash for Arnhem. |
 |
| The Arnhem defenders launch an attack on the western perimeter to take pressure off from that direction. |
 |
| Andrew's Cromwells play a deadly game of cat and mouse, knocking out several German tanks from flank shots. Unlucky for Damian, the Cromwells continue to survive an appalling amount of 88 fire! |
 |
| Andrew's other troop dispatches some Panthers with the help of David's 11th AD, |
 |
| Jonathan's Panthers push forward, losing one of their numbers to Andrew's Cromwell. |
 |
| Meanwhile, Blair and I focus on clearing Kit's infantry and heavy tank-hunters ensconced between Nijmegen and Arnhem. |
 |
| Paul's armored jeep made a dash into Arnhem, surviving a lot hate from Kit's and KG Knaust's troops! |
 |
| Andrew's and David's blocking forces are finally dealt with and the Germans press on toward Nijmegen. The Axis captured the Allied objective south of Nijmegen. |
 |
| Andrew A.'s StuGs return to play after briefly holding up Bob's Cromwells, which go on to shut down the German objective north of Nijmegen. They arrive to reinforce the southern front. |
 |
| Kit's Jagdpanthers pull back, having fought a tough withdrawal, |
 |
| The Germans put the pressure on the British in Arnhem. Where is 30 Corps?! |
 |
| Ah, there it is. The last of Andrew's Cromwells hold the Nijmegen bridge. |
 |
| A platoon of Paul's paratoopers mounts up on Bob's Cromwells and Challenger and speed toward Arnhem, passing through Blair's Sherman tanks. |
 |
| Blair smashes open the way to Arnhem while my 82nd Airborne secure the flank (looking for panzerfausts to loot, no doubt!) |
 |
| The perimeter is slowly collapsing, but holds. |
 |
| Damian's Tigers and Jonathan's Panthers navigate the Allied wrecks on the Nijmegen bridge. |
 |
| I named this gun Damian's Bane, for obvious reasons. |
 |
| This one was named Greg's Bane, for pinning down his FJ for no fewer than four turns. |
 |
| Andrew's force is utterly destroyed and redeployed to Arnhem, now possible with an open route to Arnhem. The reinforcements are sorely needed and reverse the Allied withdrawal in Arnhem. |
 |
| Kit's grenadiers return to the battle north of Arnhem! |
 |
| My 75s and mortars rain down HE shells on the Nijmegen bridge pinning Jonathan's and Greg's infantry. Meanwhile, Steve's Panthers return to the battle and the Germans rally and push across the bridge. A small German task force is dispatched to recover the objective north of Nijmegen. |
 |
| Paul and I mount up on tanks and double-time across the Arnhem Bridge. I made is another 6" to the half-way mark on the bridge before time is called! |
Time was called at 10pm and VPs tallied:
The Allies destroyed three German companies (Andrew A's StuGs, Kit's Grenadiers, and Steve's Panthers). They also hold two objectives at the end of the battle (Arnhem and Nijmegen, barely). The Allied total was 5VP
The Axis also destroyed three companies (Andrew H's Welsh, David's 11AD, and Dan's British Airlanding troops). They also held all three of their objectives plus one Allied one on the Nijmegen-Eindhoven Highway. The Axis total was 7VP.
An Axis Victory!
In terms of the overall campaign, the Allies grabbed a lot of terrain in the last turn. But the Germans rallied big time, snatching Eindhoven and throwing all of the Allied gains out of supply. This resulted in some radical shifts in VPs.
After tallying up the areas captured in Turn 4 and in the mega battle, the results were as follows:
| Location | Location | VP | Controlled | Supply | Value | Axis VP | Allied VP |
| Albert Canal | E44 | 6 | Axis | No | 3 | 3 | 0 |
| Arnhem Bridge | T12 | 60 | Allied | No | 30 | 0 | 30 |
| Boxmeer Bridge | U28 | 10 | Allied | No | 5 | 0 | 5 |
| Eindhoven | M43 | 10 | Axis | No | 5 | 5 | 0 |
| Gelderland Bridge | D13 | 6 | Axis | Yes | 6 | 6 | 0 |
| Grave Bridge | Q24 | 20 | Allied | No | 10 | 0 | 10 |
| Helmond Bridge | Q43 | 10 | Axis | Yes | 10 | 10 | 0 |
| Ijessel Bridge | X9 | 20 | Axis | Yes | 20 | 20 | 0 |
| Maas Bridge | W41 | 6 | Axis | Yes | 6 | 6 | 0 |
| Maas-Waal Canal Bridge | R23 | 20 | Axis | No | 10 | 10 | 0 |
| Nijmegen Bridge | S19 | 50 | Allied | No | 25 | 0 | 25 |
| s'Hertogenbosch | I28 | 10 | Axis | Yes | 10 | 10 | 0 |
| Son Bridge | M40 | 20 | Allied | No | 10 | 0 | 10 |
| Tillburg Bridge | C40 | 6 | Allied | Yes | 6 | 0 | 6 |
| Turnhout Bridge | C43 | 6 | Allied | Yes | 6 | 0 | 6 |
| Utrecht | C6 | 20 | Axis | Yes | 20 | 20 | 0 |
| Veghel Bridge | M33 | 20 | Allied | No | 10 | 0 | 10 |
| Vught Bridges | G30 | 10 | Allied | No | 5 | 0 | 5 |
| Wilhelmina Canal Bridge | J39 | 10 | Allied | No | 5 | 0 | 5 |
| Zaltbommel Bridges | E23 | 6 | Axis | Yes | 6 | 6 | 0 |
| Total | | 326 | | | | 96 | 112 |
The difference between the two is 16VP in favor of the Allies. While this may seem like an Allied victory, let's have a look at what the campaign results chart has to say:
- Win by 150 VP = Strategic Victory
- Win by 100 VP = Operational Victory
- Win by 50 VP = Tactical Victory
- Anything Less = DRAW!
The book has this to say about the result:
"The Allies have pushed deep into Holland but the Germans have managed to fall back and form a new front line on the lower Rhine. Both sides have fought each other to a standstill and neither army is capable of sustaining an offensive or a counterattack."
To the Allied Commanders:
"As the British General(s) you have lost the initiative and prestige of the British Army, any further offensive will be led by the American Army Groups in France."
To the Axis Commanders:
"As the German General(s) commanding the Army in Holland you can look forward to disgrace in the eyes of Der Fuhrer. You most likely will be relieved of your command."
To wrap up:
Many thanks to all of the TCOW gents and the people who joined us on Saturday! It was certainly a pleasure to organize things on this end and work with a great group of players. I hope you all had lots of fun, and I look forward to our next event!


After the hell my Paras went through at Arnhem the Yanks can bloody well take over from here! :P
ReplyDeleteWas good fun start to finish, Arnhem itself was a real cauldron and the perimeter held just long enough for reinforcements to arrive. Our plan of clearing one flank and slowly giving ground on the other worked well. It was my bridge to start with, and in the end it was still my bridge! except Frost was nowhere to be seen, it was Roy holding the line.
Yes, you OWNED that bridge!
Delete